We all dream about having a professional podcasting studio at home. In my podcasting dreams, I'd stroll out the door and into a stunning podcast studio nearby whenever inspiration struck (within walking distance, of course). The studio would be professionally decorated with comfortable and stylish chairs and my pieces of equipment already set up. All I need to do is hit the red record button and go.
However, I record at home like the rest of us. Nothing beats being able to record from the comfort of your home, no matter how gorgeous that studio looks in my dreams. Although recording at home implies a comfortable sofa, it also means high ceilings and minimalist decor, which leads to echoes. There are many ways to get the quality of sound you're after (even creative changes, like putting up heavy curtains, for example!)
Now, creating your podcasting studio can be daunting. It takes time or even years to set up your perfect recording studio. You can begin with an idea, some cash, and dedicated space.
You don't have to grab the cheapest entry-level equipment available. The key is budgeting and making careful decisions. Spend when it’s necessary and save when needed.
Buying all your equipment from the store isn’t always the best option – a DIY podcasting studio can be on par with professional studios (if done right.)
Table of Content
- Choosing The Right Space
- Sound-Treat Your Podcasting Studio
- Lighting For Your Video Podcast
- Let’s Talk About Backgrounds
- Let’s Set Up Your Video Podcast Equipment and Gear
- Adding Decorations
- Don’t Forget to Upgrade
Step 1: Choosing The Right Space
The first step in creating a home podcasting studio is choosing which room to use. It must be in a quiet spot with minimal background noise or disturbances, including noisy appliances, family chatter, and regular street traffic.
Rooms with carpet and soft furniture, such as a living room, are often the best. It's because fabrics help drown out echo and reverb, resulting in significantly better sound quality.
This way, you don't have to go through the trouble of building a recording space from the ground up — you can use vacant rooms or spaces readily available to you.
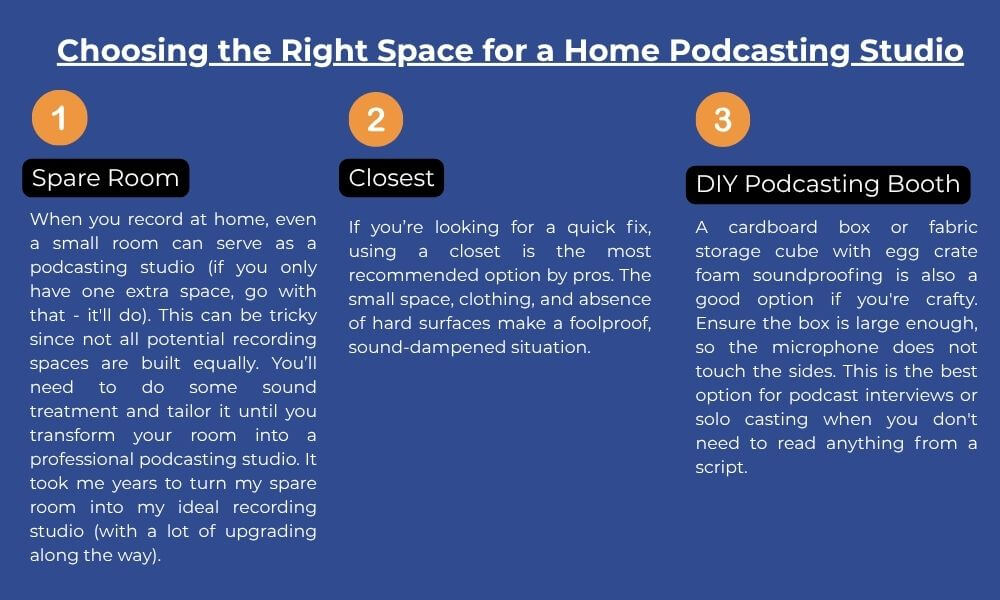
- Spare Room – When you record at home, even a small room can serve as a podcasting studio (if you only have one extra space, go with that – it'll do). This can be tricky since not all potential recording spaces are built equally. You’ll need to do some sound treatment and tailor it until you transform your room into a professional podcasting studio. It took me years to turn my spare room into my ideal recording studio (with a lot of upgrading along the way).
- Closet – If you’re looking for a quick fix, using a closet is the most recommended option by pros. The small space, clothing, and absence of hard surfaces make a foolproof, sound-dampened situation.
- DIY Podcasting Booth – A cardboard box or fabric storage cube with egg crate foam soundproofing is also a good option if you're crafty. Ensure the box is large enough, so the microphone does not touch the sides. This is the best option for podcast interviews or solo casting when you don't need to read anything from a script.
Here are great tips you can follow when choosing a space for a podcasting studio:
- No external or internal walls that connect to your neighbor's residence.
- No or very few windows.
- No noisy appliances (such as a heater or a gas meter).
- It has carpeted floors and soft furnishings.
- Has enough space for you to be comfortable.
Step 2: Sound-Treat Your Podcasting Studio

Once you've decided which room you'll convert into your podcasting studio, it's time to think about sound treatment.
So, what exactly does that mean?
Sound treatment is the process of improving the overall sound quality of a room. It usually means reducing the echo in your space (echo sucks on every level, so you should definitely get rid of it). The first time I set up my equipment, it felt like being in the Grand Canyon — adding things to your wall is one way of doing this. Creating an acoustically clean environment will make your recording more professional and appealing to your listeners.
However, if you Google “sound treatment”, you'll get pretty daunting results. You'll see wedge foam, acoustic panels, and squishy material covering the walls (and ceiling – and sometimes, even the floors). It'll seem costly (it is) and time-consuming to install (this too).
The good news is you already have materials in your house you can use (you just don't know it).
Move Away From The Noise You Can’t Control
We easily tune out everyday noises, but your podcast microphone will pick them up. When deciding which room is best for your podcasting studio, consider which space has the worst noise pollution. Keep an eye out for extra windows where you'll inevitably hear a siren or your neighbor revving their lawn mower at the worst possible moment. Take note of the sounds your house makes. Don't choose a room where you can hear any elevator doors open and close or where the radiator hisses unexpectedly. Also, be aware of the areas that are remote from your family's or roommate's daily routines to avoid picking up on their ambient footsteps.
Curtains And Window Treatment
Curtains provide a great visual barrier from prying neighbors and serve a secondary role in sound dampening.
Hanging soft, thick drapes absorb external feedback, white noise, and other unpleasant traffic sounds. On the inside, these same curtains improve the absorption of ambient noise that floats around the room.
Rugs
If you live in an apartment and want to disguise the sound from your downstairs neighbors, consider adding thick area rugs to your podcasting studio. This is another option to improve sound masking and doesn't involve spending vast amounts.
Furniture
Adding furniture pieces to your space provides more surfaces for sound to be absorbed through and reduces bounce (try adding thick blankets or soft throw pillows to your spot). It helps with better audio quality, and you get to tick the aesthetic part off for your podcasting studio.
Bookshelves
A bookshelf along the back wall behind the recording location will also contribute to the diffusion of sound waves. Aim to organize your books, CDs, and odd bits so that there are several inches of space between them. This works very well on high-frequency sounds, which is helpful if you have a ‘ringy' room.
Absorption Panels
There are affordable options on the market you can buy for your home office. However, you can check out YouTube tutorials on making your absorption panels with household materials (if you're crafty and on a budget). I got my panels from Audimute (owned by Mitch Zlotnick, a good friend), and my audio quality has never been better.
Where should you position the panels?
Focus on the walls right behind and to the sides of your camera, as this is where most of your sound will be conveyed. It's also crucial to handle the room's corners, too, because that's where sounds tend to bounce around and be reflected into the recording area.
Equipment Placement
To begin with, arranging your area in a way that reduces reflections will cost you nothing. The goal is to limit the chances of sound from your speakers bouncing off the surfaces in your space. Start by relocating your speakers away from the walls. It's a good idea to place your desk so that the sides are parallel to the longer walls of your room; this gives sound waves more room to bounce around instead of becoming trapped between the two shorter walls.
The old adage goes, ‘garbage in, garbage out,' – which means that if you capture lousy audio, that's the quality of sound you'll get. There are only so many things that audio engineers can fix. So, record as neatly as possible to make later editing and mixing easier.
Step 3: Lighting For Your Video Podcast
If you only do audio podcasts — you can skip this part.
Good lighting makes you look natural and appealing and plays an essential role in setting the mood and tone.
Some tools can help you improve your lighting, increase the quality of your videos, and set you apart, regardless of your budget or experience.
What type of home lighting equipment can you use?
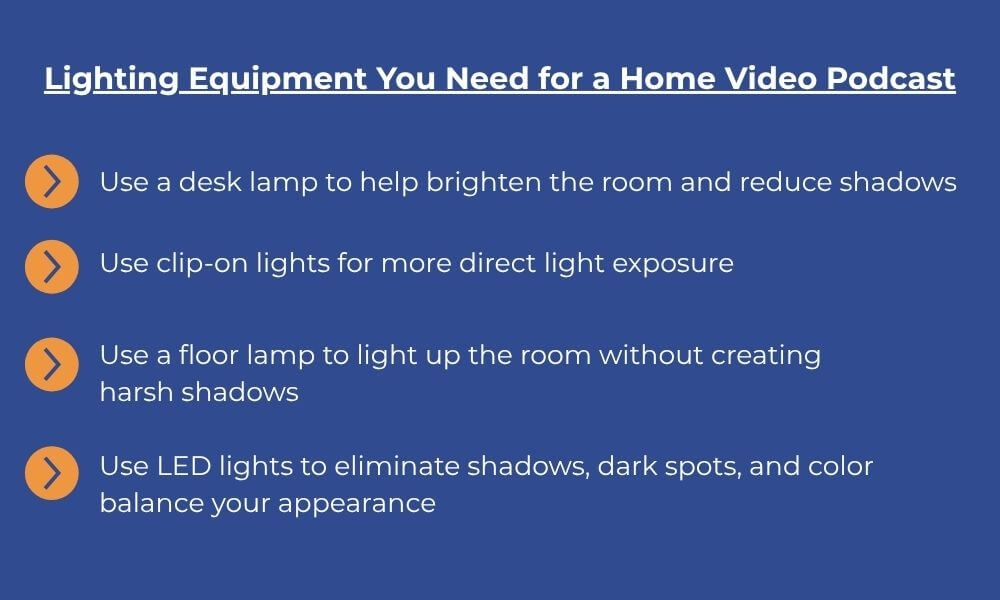
- A desk lamp – to help brighten the room and reduce shadows.
- Clip-on lights – can be attached to tables or other surfaces to give more direct light exposure.
- A floor lamp lights up the room without creating harsh shadows on people or things.
- LED lights – these lights not only eliminate shadows and dark spots in your videos, but they also color balance you, so you don't appear too pale or dark.
No one sets up their lighting perfectly on their first try. It's a process of trial and error.
Spend some time experimenting with your lighting setup to find the right balance of light and shadows. Try several setups, changing the position of your lights each time, and then compare them with test shots or stills. Follow the three-point lighting rule which means lighting each speaker from the front (key light), from beside (fill light), and from behind (backlight).
You can and should use natural light whenever possible. Under the right conditions, a window can serve as a key light, while reflectors produce fill light and backlight.
Natural light is free and can be a powerful source of lighting (but be aware of its drawbacks). Natural light fluctuates, making taking video shots at different times of the day difficult. Even in my home office, I tried to use natural light coming from my window. However, the difference in temperature between natural light and lighting tools makes it challenging to get a consistent color quality.
Light can appear cool or warm to the human eye and on camera. Warm light has a yellow hue, whereas cool light has a white or light blue shade. Consider a warm-lit living room vs. a fluorescent-lit dentist's office (cool light). When adjusting your light, avoid combining bulbs of different color temperatures; this will result in inaccurate white balance and inconsistent, unnatural-looking footage. The great thing about the light bar (LED light) that I set up is it allows me to adjust the temperature from cool to warm — making me look good in my recordings. If you're also using LEDs, changing their color temperature to make sure they match your other lighting is a must.
You don't need the best gear to produce good lighting. Although investing in lights and equipment can help you step up your game, many DIY and low-budget options exist.
Also Read: The Secret of Getting High Net Worth Clients – Stop Selling & Start Serving
Step 4: Let’s Talk About Backgrounds
The background of your podcasting studio creates the feel you’re going for. I prefer the “real world” background where I can draw my audience and maintain that intimacy with them the entire time. The perks of having your workstation are that you can customize it and go for the feel you want. The possibilities are endless. You don't need to worry about one of your family being caught on camera while you record your episodes.
And what's better than a good background than a branded one! Putting up a poster or a banner of your brand as part of your background lets your audience know about you and the services you offer before you even talk about it. This is completely optional, but I do this in my home office — and I love the credibility it adds to my podcasts.
You're probably thinking, why not use virtual backgrounds? You can absolutely go for it! However, I'm generally not a fan and here's why. When there's no contrast between you and the background, a portion of your face or even your hair will be cut off every time you move. If this happens I tell my guest to turn off their virtual background — it's just unsettling. Now if you can work out the lighting and good subject lighting then your virtual background might be okay. Between you and me — I'd go for the “real world” background!
Step 5: Let’s Set Up Your Video Podcast Equipment and Gear
Podcast Camera
I spend 30 hours a week in front of the camera recording my episodes. So when I position my camera I think of angles and what shots I'm going to take for my podcast.
- Overhead shot – position a camera overhead to create a behind-the-scenes atmosphere. What you're doing with your audio mixer or computer will be captured from above.
- Wide shot – this shot captures your podcasting studio setup and even what's behind you.
- Main shot of each podcast host and guest – this is good when you're interviewing someone — you'll want a decent shot of your guest and not just you. Position the camera so they're framed similarly. You don't want a close-up shot of yourself and a wide-angle shot of your guest.
- Medium shot -This is the shot I use when I record my podcasts – a shot with the torso and shoulders (if you have one camera in your podcasting studio this shot will work for you).
Check that your camera is focused correctly. If you're using a DSLR like me, make sure your ISO, shutter speed, and exposure settings are on point. I recommend using lenses for a narrower depth of field. Otherwise, your images would be overexposed, dark, and blurry. Remember that all settings are tied to lighting, so adjust accordingly.
Pro tip: I use Sigma Art Prime for this, making my videos stand out and more professional.
Hooking Up Your Podcast Microphones And Audio Mixer
Quality audio is a must when it comes to podcasts. If you're starting a video podcast, you already use good-quality microphones. If you're still in the market for microphones, I recommend you check out the AT2005USB (this is what I use). I'm a huge fan of Audio Technica — and their mics never fail to deliver good audio. It's a flexible microphone that may be used on the show, in the studio, and more.
On top of that, I use pop filters to improve the sound quality picked up by my microphone by reducing popping sounds when I use certain sounds, pronunciations, or noises such as “P's” and “B's.”
What if you have a really quiet guest who needs to raise their volume?
This won't be a problem for you if you have a mixer. I've experienced this with a guest and having a mixer gave me more control to solve this by raising their volume or lowering mine to match theirs.
You're probably starting to realize there are numerous ways to manage audio for your video podcast, and you're right. This is perfect because podcasters are huge audiophiles. Choose the route that works best for you.
Here are more equipment that you’ll need for your podcasting studio:
- Computer – If you're on a tight budget or are perfectly happy with what you have, stick with it. If you have a bigger budget, then feel free to upgrade. You'd want a dependable computer with quick processing speed and plenty of storage. This is due to the size of the audio (and maybe video) files you will be recording. It took me some time to upgrade my gear, too. Do it gradually and if you see the need to do so.
- Headphones – Lets you monitor your audio closely while canceling any interfering background noise.
- A mic stand – You may think that once you've gathered the rest of your gear, a mic stand is an extra. Definitely not! A microphone stand keeps your microphone in position and prevents it from picking up vibrations, knocks, and bumps.
- Boom arm – It can free up a lot of space on your desk, and honestly? It appears and feels more professional. Because your microphone is suspended, you can quickly get the perfect mic positioning, ensuring your voice sounds its best. It will also help reduce handling noise, vibrations, and knocks your microphone will undoubtedly pick up.
- Desk work station with a good chair – If you're like me, you spend at least 6 hours a day in your home studio; taking care of your back and comfort is crucial! You can repurpose some of the furniture you have for this. However, if you have extra cash, I recommend getting an ergonomic chair!
Step 6: Adding Decorations
You can go wild with whatever decorations you want to add to your studio background. I wanted to keep it simple, so I ended up with ‘functional' decorations propped up in my home office.
Here are some ideas you can take as inspiration:
- Reduce echo (grass cloth wallpaper + rug).
- Light the place up bright (lamps + hue lighting).
- Add a full audio/video setup (lots of video/audio gear).
- Have tables/chairs for you and any guests (you should find the perfect size setup for your room).
A dedicated home office will make it easy for you to set up a small podcasting studio suitable for audio and video podcasts.
Step 7: Don’t Forget to Upgrade
My podcasting studio is a combination of DIY and non-DIY. As I said, it took me years to convert my home office into my ideal studio — so don't be frustrated if you start modestly. You can do it gradually, bit by bit (just like I did).
If you want more inspiration on how to create your podcasting studio, you can watch this video of my setup and the recent upgrades I made. This can be helpful for you if you're unsure of what to get for your sound treatment.
Implement these tips as you plan your podcasting studio, and you'll be well on your way to creating something with ease of use, style, and personality that will make any of your viewers feel welcome. In the end, it's about those listening to the story you'll tell; this setup will allow them to enjoy it.
Listen to the Thoughtful Entrepreneur
More Resources from UpMyInfluence:
How to Be An Exceptional Podcast Host
LISTEN TO OUR PODCAST: